
Learn how using a Google Sheets localization template can help handle your translations. Then, discover how to integrate your Google worksheet with Gridly for even better results.
How to use a Google Sheets template for localization
We’ve put together a simple, free, and easy-to-use Google Sheets template for your next localization project. Grab them here, and feel free to copy them for your own use:
- Basic template (no macros)
- Advanced version (with macros)
The basic version allows you to set source and target languages, but the advanced version includes macros that let you add new languages in just one click.

The columns in the Google Sheets localization template
Let’s establish exactly what each color and column title means, and what sort of content you can expect to place there.
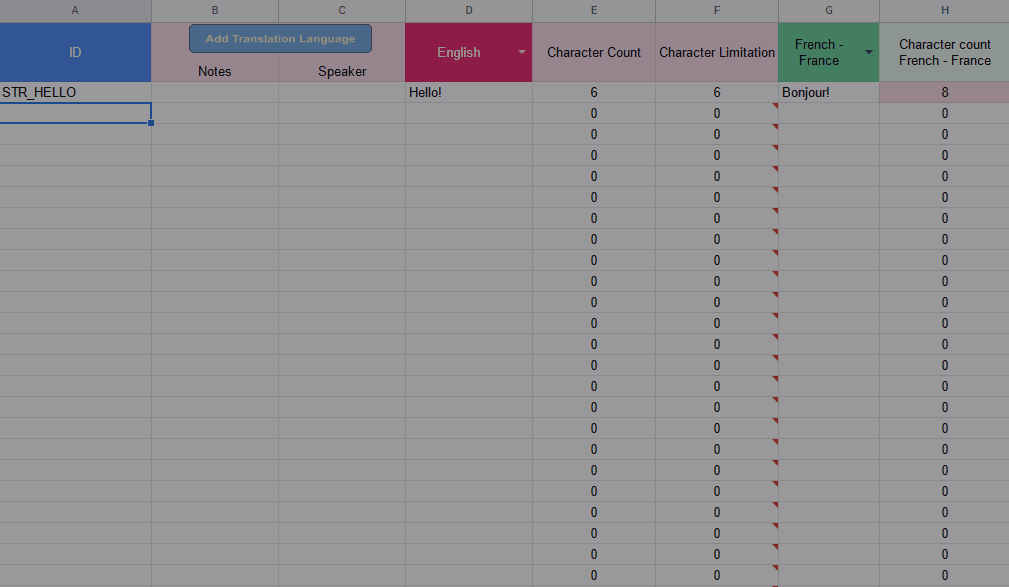
Blue column: String identifiers
- ID: The string ID of a given string.
Pink columns: source content
- Notes: Context or guidance for a translator, or other relevant information.
- Speaker: The name of the person or character speaking the line, if any.
- [Language name]: A source language.
- Character Count: The number of characters in the string.
- Character Limitation: The maximum allowable character count for the string, in any language.
Green columns: target content
- [Language name]: A target language.
- Character count - [language name]: The number of characters in the string for this language. Note: If a cell in this column appears pink, it means that the translation exceeds the character limitation as described above.
How to set up the Google Sheets localization template
- Open the free template in your browser. Click the drop-down button in a dark pink cell to select a new source language, or keep it in English by default.

- Click the drop-down arrow in any of the dark green cells to change the target language. The Character Count column for that language will update automatically.
- To add more target languages to your sheet, copy one of the current target language column pairs and paste it at the end of the sheet to the right. Then, use the drop-down menu to select your new target language.

Your template is now ready! Want to step things up with macros? Here’s how to use the advanced version:
How to set up the advanced Google Sheets localization template
It can be cumbersome to copy-paste a new set of columns every time you want to add a new language. That’s why we wrote a macro that automatically adds new languages with just one click.
Here’s how to use it:
- Open the advanced Google Sheets localization template in your browser.

- To add a new source language, select column D. Then, Click the Add Translation Language button to trigger the macro and add a new language. Follow the prompts to approve the macro for your browser and Google account.
- A new source language column will appear next to your current one. Click the drop-down arrow to change its source language.

- To add a new target language, select one of your current target languages, then click the Add Translation Language button. The new language will appear to the right of the language you’ve selected.
- Select a target language using the drop-down arrow in your new target language column.

After you’ve added all your required source and target languages, you’re ready to add strings and get localizing!
How to add content to the Google Sheets localization template
- Under the ID column, begin a new row and enter the name of the string ID you’d like to localize. In this example, the name of the new string is STR_ACCEL.
- Add any relevant notes, such as guidance for your translators, in the Notes column. If needed, enter the name of the character or person speaking this line in the Speaker column.
- Enter the text of the string in your source language. The Character Count cell will automatically reflect the number of characters in this string.
- The Character Limitation is set to match the Character Count by default. To change it, enter a new maximum character count in this column.
- Translators can enter their translations in the same row under their respective languages. The respective Character Count column will update automatically, and the Character Limitation column will check if the translation exceeds the limit or not.
- In the example above, we can see that the French translation for accelerate falls under the character limit, but the translation for hello does not.
Here’s what a completed sheet looks like. Notice how many of the translations exceed the character limits — there’s still plenty of work to be done!

The benefits of a Google Sheets localization template
Templates make your localization process more efficient by removing the guesswork. There’s no need to figure out how to set up a Google Sheet for localization — all you need to do is plug in your strings, then let your translation team work their magic.
Using a template is the best way to enjoy the benefits of Google Sheets while also avoiding some of the reasons why Google Sheets isn’t great for localization. Here’s how this template can boost your localization workflow, reduce errors, and speed things up:
- Easy to navigate: Our research shows that sorting your localization worksheet by language name is the easiest way to find content fast.
- Prioritize languages: The languages included in our sheet are the most common languages used in localization. And it’s easy to add more with the Data Validation function in Google Sheets.
- Control string length: The automated Character Count and Character Limit columns make it easy to see if any translations are too long. Translators can quickly check their work for length issues before submitting.
- Unique column names: Each column has its own unique name. This makes it a confusion-free process to import content from this template to Gridly or another CMS.
Connecting your template with Gridly
There’s no need to abandon Google Sheets if you want to enjoy all the specialized localization features in Gridly. Connect the two together, and Gridly will import all your content in a single click.
To get started, click the Integrations icon in the Gridly header. Select Gridly connector, then add your Sheet as a source.
Learn more about connecting Google Sheets with Gridly here or watch our 1-minute demo video.
When you manage your localization projects with Gridly, you’ll get a whole lot more than Google Sheets has to offer. Here’s a short look at a few of the ways Gridly can streamline your workflow speed up the localization process, and improve your results:
- Safeguard your data with granular access permissions and audit trails.
- Identify outdated and completed content instantly with source–target status tracking.
- Store images, gifs, videos, audio files, and other content to centralize your workspace and improve quality assurance.
- Get more accurate results with the built-in translation memory and localization glossaries.
Level-up your localization process with a dedicated content management platform.